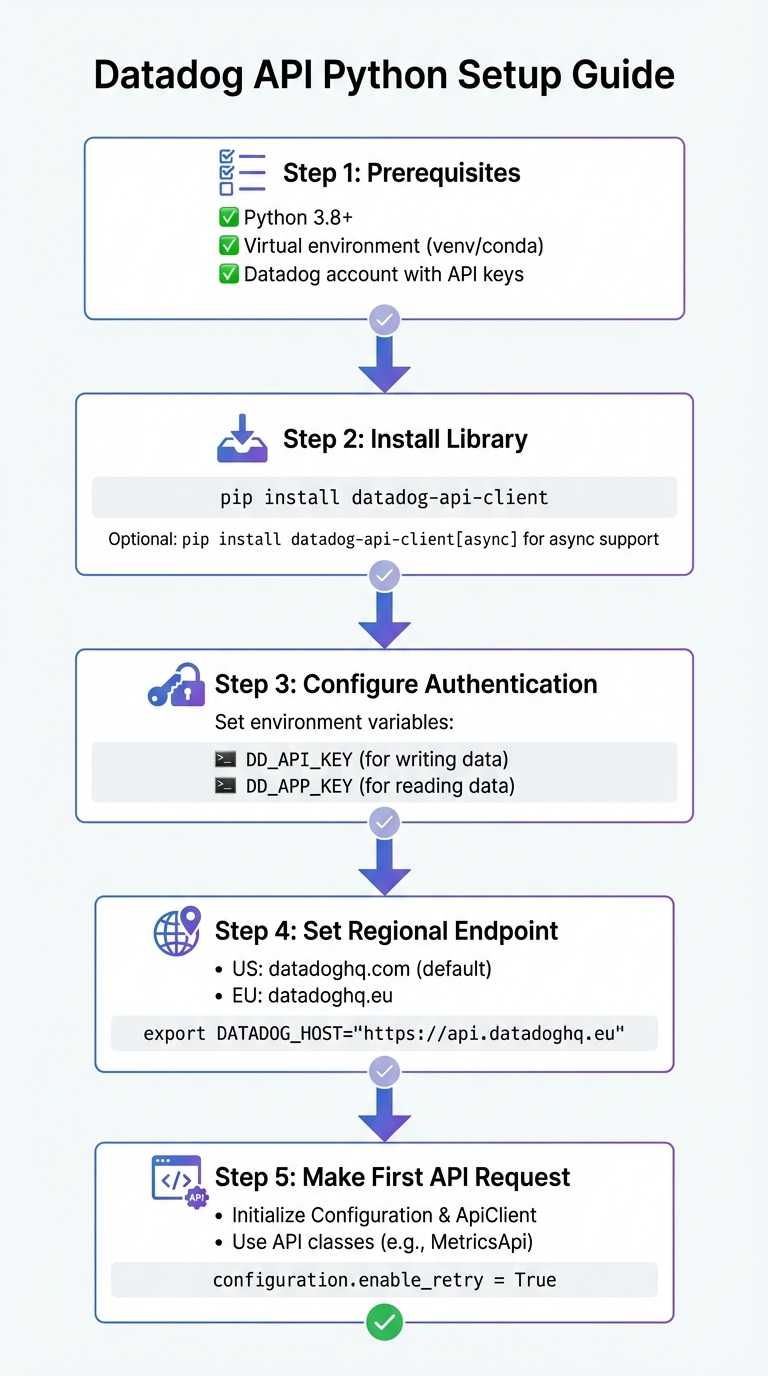
Datadog API Python Setup Guide
Install and configure the Datadog Python API client: set DD_API_KEY/DD_APP_KEY, configure region, query metrics, and enable retries/debugging.

The Datadog API lets you automate monitoring tasks like tracking metrics, managing dashboards, and creating alerts. This guide explains how to set up and use the Datadog API with Python. Here's what you need to know:
- Requirements: Python 3.8+ and Datadog API/Application Keys.
- Installation: Use
pip install datadog-api-clientfor the library. Add[async]for asynchronous support if needed. - Authentication: Store
DD_API_KEYandDD_APP_KEYas environment variables for secure access. - Regional Settings: Adjust the endpoint if your Datadog account is in the EU (
DATADOG_HOST="https://api.datadoghq.eu"). - Making API Requests: Use the
ApiClientandConfigurationobjects to interact with Datadog. Example: Querying metrics like CPU usage.
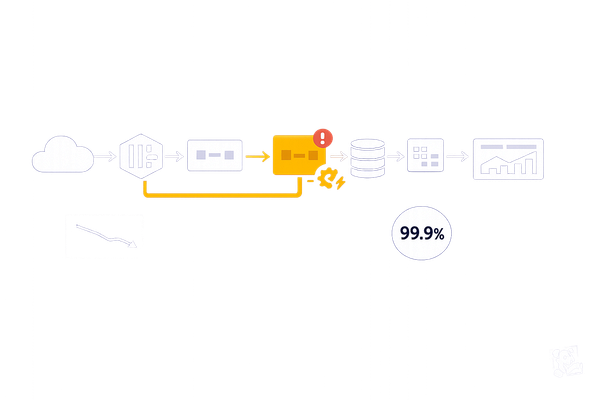
Key tips include enabling retries for rate-limited requests and using debug mode for troubleshooting. After setup, you can automate tasks and explore advanced features like async operations and CI/CD visibility.
Datadog API Python Setup: 5-Step Configuration Guide
Sending Custom Metrics, tags to DataDog using Python
Prerequisites for Setting Up the Datadog API
Before diving in, make sure your Python setup is ready and you’ve got your Datadog credentials handy.
Python Environment Requirements
To use the official datadog-api-client library, you’ll need Python 3.8 or later. It’s a good idea to use a virtual environment like venv or conda to keep your dependencies organized and separate from other projects.
If you plan to handle concurrent tasks or non-blocking I/O, you’ll also want to install async support. You can do this by adding [async] when installing the library.
Datadog Account and API Keys
You’ll need two types of keys from your Datadog account:
- API Key (for writing data)
- Application Key (for reading data)
Store these keys as environment variables: DD_API_KEY and DD_APP_KEY. The Python client will automatically use them for authentication.
If you’re working with the EU instance of Datadog, make sure to set the DATADOG_HOST environment variable to https://api.datadoghq.eu to avoid connection issues.
Once everything is set up, you’re ready to install the Datadog Python API client using pip and start working with the API.
Installing the Datadog Python API Client
Using pip to Install the Library
The Datadog Python library, named datadog-api-client, is available on PyPI. To install it, simply run this command in your terminal:
pip install datadog-api-client
This library provides access to both the V1 and V2 Datadog API endpoints. After installation, you can verify it by running:
python -c "import datadog_api_client; print('Success')"
If you see "Success" printed, the installation was successful.
Important: There's an older library called datadog (also known as datadogpy) that supports DogStatsd and legacy API usage. For modern HTTP API interactions, stick with datadog-api-client.
If your project uses asynchronous code, you’ll need to enable async support - details are below.
Optional Async Support
For projects that use asyncio, you’ll need to include async-specific dependencies since the default installation doesn’t include them. Use this command:
pip install datadog-api-client[async]
With this, you can utilize the AsyncApiClient for non-blocking operations. API methods will return coroutines, which you’ll need to await within your async functions. If your project doesn’t involve async programming, the standard installation is sufficient.
Configuring Authentication and Regional Settings
Once the client is installed, the next step is to set up credentials and endpoints to secure access and ensure the correct regional configuration.
Setting API and Application Keys
The Datadog Python API client requires two key credentials: an API key (used for writing data) and an Application key (used for reading data and providing full access).
To keep your credentials secure, it's best to use environment variables. You can set them directly in your terminal or store them in a .env file:
export DD_API_KEY="your_api_key_here"
export DD_APP_KEY="your_app_key_here"
If you'd rather configure credentials programmatically, here's how you can do it in Python:
from datadog_api_client import Configuration

configuration = Configuration()
configuration.api_key["apiKeyAuth"] = "<YOUR_API_KEY>"
configuration.api_key["appKeyAuth"] = "<YOUR_APP_KEY>"
For consistency, this guide uses DD_API_KEY and DD_APP_KEY as the default environment variable names for the Datadog Python client.
If your account is hosted outside the United States, you'll also need to adjust the regional settings.
Configuring Regional Endpoints
By default, the client connects to Datadog's US site at datadoghq.com. However, if your Datadog account is hosted in Europe, you'll need to update the endpoint to match your region. You can identify your region by checking your Datadog account URL - if it ends in .eu, your account is hosted in Europe.
To configure the client for the EU region in your code, use the following:
configuration = Configuration()
configuration.server_variables["site"] = "datadoghq.eu"
Alternatively, you can set the DATADOG_HOST environment variable to the full API URL for your region:
export DATADOG_HOST="https://api.datadoghq.eu"
Here's a quick reference table for regional settings:
| Region | Site Value | API Host URL |
|---|---|---|
| United States (US1) | datadoghq.com |
https://api.datadoghq.com |
| Europe (EU1) | datadoghq.eu |
https://api.datadoghq.eu |
Making Your First API Request
Once your configuration is set, you're ready to make your first API call. After setting up credentials and regional preferences, the next step is to create a Configuration object, initialize an ApiClient, and use an API class to perform your request.
Initializing the Client
For the Datadog Python client, you'll need two main objects: Configuration and ApiClient. The Configuration object stores your authentication details and regional settings, while the ApiClient handles HTTP connections.
Here’s an example of how to set up the client:
from datadog_api_client import Configuration, ApiClient

configuration = Configuration()
# API keys are automatically loaded from DD_API_KEY and DD_APP_KEY environment variables

with ApiClient(configuration) as api_client:
    # Place your API calls here
    pass
Using the with statement ensures that connections are properly closed when you're done.
Example: Fetching Metrics
To retrieve metrics from Datadog, you’ll use the MetricsApi class from the v1 API module. Here’s an example that fetches the average CPU idle time across all hosts:
from datadog_api_client import Configuration, ApiClient
from datadog_api_client.v1.api.metrics_api import MetricsApi
from datetime import datetime, timedelta

configuration = Configuration()

with ApiClient(configuration) as api_client:
    api_instance = MetricsApi(api_client)

    # Define the time range (last hour)
    to_time = int(datetime.now().timestamp())
    from_time = int((datetime.now() - timedelta(hours=1)).timestamp())

    # Query metrics
    response = api_instance.query_metrics(
        _from=from_time,
        to=to_time,
        query="avg:system.cpu.idle{*}"
    )

    print(response)
The query_metrics method requires POSIX timestamps and a metric query string. This example demonstrates a simple query, laying the groundwork for more advanced API interactions.
Error Handling and Debugging
When troubleshooting API requests, you can enable debug mode by setting configuration.debug = True. This logs the full HTTP request and response details, which can help identify issues.
You can also enable automatic retries for rate-limited requests by setting configuration.enable_retry = True. By default, the client retries up to 3 times when it encounters a 429 status code. If needed, you can adjust the retry limit using configuration.max_retries.
Here’s an example that incorporates error handling:
from datadog_api_client import Configuration, ApiClient
from datadog_api_client.v1.api.metrics_api import MetricsApi
from datadog_api_client.exceptions import ApiException

configuration = Configuration()
configuration.enable_retry = True
configuration.debug = False  # Set to True for detailed logs during troubleshooting

try:
    with ApiClient(configuration) as api_client:
        api_instance = MetricsApi(api_client)
        response = api_instance.query_metrics(
            _from=1704326400,
            to=1704330000,
            query="avg:system.cpu.idle{*}"
        )
        print(response)
except ApiException as e:
    print(f"Request failed: {e}")
The Datadog library provides specific exceptions in the datadog_api_client.exceptions module, making it easier to handle various API errors. For instance, you can catch and address authentication issues, rate limits, or server errors separately. This ensures your application can respond gracefully to different scenarios.
Conclusion and Next Steps
You've successfully set up a Datadog API client in Python! Here's a quick recap: install the datadog-api-client via pip, configure your DD_API_KEY and DD_APP_KEY as environment variables, define your regional endpoint if necessary, and initialize the client. With Python 3.8+ in place, you can now query metrics, monitor incidents, and automate various tasks seamlessly.
Key Takeaways
Before diving deeper, make sure you've nailed these essentials:
- Use a Python 3.8+ environment.
- Secure your credentials by storing them in environment variables.
- Configure regional settings correctly. For instance, EU accounts should set the host to
https://api.datadoghq.euto avoid connection errors. - Enable automatic retries using
configuration.enable_retry = Trueto handle rate limits effectively. You can tweak this further withmax_retriesif needed.
Once these basics are in place, you're ready to explore more advanced capabilities.
Advanced Features to Try Next
After mastering the fundamentals, consider diving into Datadog's advanced features. The v2 API offers Workflow Automation, enabling you to connect with third-party platforms like AWS, GitLab, and Slack. This integration allows you to automate remediation processes, saving time and reducing manual efforts. Additionally, Agentless Scanning can help identify vulnerabilities across hosts, containers, and serverless environments without requiring agent installation.
For applications requiring high performance, try using the AsyncApiClient for non-blocking operations or the ThreadedApiClient for parallel execution. These options ensure your application doesn't stall during API calls. If you're working in DevOps, the CI Visibility API provides a powerful way to analyze CI/CD events, helping you pinpoint bottlenecks in your pipelines.
Handling large datasets? Use built-in pagination methods like list_incidents_with_pagination to retrieve all items efficiently - no need for manual offset adjustments. To experiment with new features, you can enable them by setting configuration.unstable_operations["<OperationName>"] = True in your configuration.
For even more insights and advanced strategies, check out Scaling with Datadog for SMBs.
FAQs
What is the best way to securely store Datadog API keys in a Python project?
To keep your Datadog API keys secure in a Python project, it's best to use environment variables. Here's how you can set them up:
-
On macOS/Linux: Add the following lines to your shell profile (e.g.,
~/.bash_profileor~/.zshrc):export DD_API_KEY="your-datadog-api-key" export DD_APP_KEY="your-datadog-app-key" -
On Windows: Use PowerShell to set the variables:
$Env:DD_API_KEY = "your-datadog-api-key"
$Env:DD_APP_KEY = "your-datadog-app-key"
The Datadog Python client automatically detects these environment variables, so there's no need for additional configuration.
For an extra layer of security, consider storing these keys in a .env file and using the python-dotenv library to load them into your application. Make sure to add the .env file to your .gitignore file to prevent it from being included in version control.
In production, take it a step further by using a secret management tool like AWS Secrets Manager. This approach allows you to manage and inject credentials securely at runtime, eliminating the need to hardcode sensitive information in your codebase.
What are the advantages of using async with the Datadog Python API client?
The Datadog Python API client includes optional async support, which lets you make non-blocking API calls. This feature is particularly useful for applications dealing with high-concurrency or I/O-intensive tasks. By using async, your program can process Datadog requests without disrupting the main execution flow.
In environments where managing multiple tasks at once is crucial, async can help maintain responsiveness and streamline performance, ensuring your application runs smoothly.
How do I resolve connection issues with the Datadog API in different regions?
To resolve connection problems with the Datadog API across different regions, start by confirming you're using the correct API endpoint for your Datadog site. For instance, use https://api.datadoghq.com for US‑1, https://api.datadoghq.eu for the EU site, or the specific endpoint for your region. Double-check that the DATADOG_HOST environment variable or your client configuration is set to match your account's region.
Next, ensure your network settings permit outbound traffic on the necessary ports. Typically, the Datadog Agent uses port 443 for secure connections, but you should verify this based on your region and setup. Also, check that firewalls, proxies, or security groups are not blocking these connections.
Lastly, verify that your API and application keys are accurate and associated with the correct Datadog site. If you're using the Python client, update it to the latest version and ensure it supports Python 3.8 or newer. If the issue continues, review the HTTP response code and error message to identify the root cause, or reach out to Datadog support with details specific to your region.